Simulation Compiler#
The SimulationCompiler turns an OpenVCAD design into a finite-element mesh plus cell-wise simulation data. The supported backends in this guide are:
GENERICfor a solver-neutralSimulationModelreturned to Python or C++FENICSX_XDMFfor.xdmf+.h5mesh/data bundlesABAQUS_INPfor.inpmesh exportLSDYNA_Kfor a geometry-only LS-DYNA keyword deck (.k)
This page is a hands-on guide to the exporter workflow. It is organized as five lessons: a volume-fractions export, an export-only direct-mechanical beam, a self-contained OpenVCAD-to-FEniCSx beam solve, generic in-memory model access, and an LS-DYNA keyword export. It covers tetrahedral XDMF/H5, hexahedral Abaqus, tetrahedral LS-DYNA, and both mesh families through Python objects. It also explains the two cell-data modes that matter most:
volume_fractionsexported as both a stochasticmaterial_idfield and rawvolume_fraction_*fieldsdirect scalar fields such as
modulus,poissons_ratio, anddensityexported directly per element
Prerequisites#
OpenVCAD installed with
pip install OpenVCADFamiliarity with the Getting Started guide and the Functional Grading Guide
The guide example files live under examples/compilers/simulation/:
01_volume_fractions_export.py02_direct_mechanical_properties_export.py03_fenicsx_load_exported_design.py04_generic_in_memory_model.py05_lsdyna_graded_gyroid.py
What this compiler exports#
The simulation compiler always starts from the same ingredients:
a prepared OpenVCAD design
a target mesh type
one transport backend
the attributes you want carried into the simulation mesh
The backend selects transport, not meshing behavior. All backends consume the
same compact prepared model, so callers can switch destinations without
changing geometry or cell-data semantics. GENERIC creates no files; after
compile(), call model() to access topology, nodes, flattened zero-based
connectivity, cell centroids, material fields, volume fractions, and scalar
fields:
settings = pvc.SimulationCompilerSettings()
settings.backend = pvc.SimulationBackend.GENERIC
settings.mesh_kind = pvc.SimulationMeshKind.HEX

hex_settings = pvc.SimulationHexMeshSettings()
hex_settings.voxel_size = pv.Vec3(1.0, 1.0, 1.0)
settings.hex_settings = hex_settings

compiler = pvc.SimulationCompiler(root, settings)
compiler.compile()
model = compiler.model()
print(model.cell_type, len(model.nodes), len(model.connectivity))
assert compiler.written_files() == []
The mesh itself can be:
hexahedral using a regular voxel-style grid
tetrahedral using a tet mesh with variable sized elements
For fixed geometry, mesh settings, dependency versions, and random_seed, the
compiler emits deterministic compact node and element identity. Compact means
that every returned or written node is referenced by at least one element.
The attribute path depends on what you attach to the model:
volume_fractionsis treated as a multi-material mixture. The compiler samples the continuous mixture, performs a deterministic weighted stochastic draw per element, and writes the resultingmaterial_idfield. It also writes the rawvolume_fraction_*cell fields for convenience.direct scalar attributes such as
modulus,poissons_ratio, anddensityare sampled directly as cell-wise values. There is no stochastic material draw in this path.
Why XDMF comes with an H5 file#
The .xdmf file is the lightweight descriptor that tells downstream tools where the mesh and cell datasets live. The bulk numeric arrays live in the paired .h5 file. In practice:
.xdmfdescribes the topology, geometry, and named attributes.h5stores the actual node coordinates, element connectivity, and cell-data arrays
That pairing is the normal way to move simulation-sized meshes into tools such as DOLFINx/FEniCSx and viewers such as ParaView.
Lesson 1: Volume fractions#
The script examples/compilers/simulation/01_volume_fractions_export.py builds a centered rectangular bar with a left-to-right material blend. It exports the same design three ways:
hex + Abaqus
tet + XDMF/H5 (high resolution)
tet + XDMF/H5 (low resolution)
import os
import shutil

import pyvcad as pv
import pyvcad_compilers as pvc
import pyvcad_rendering as viz

materials = pv.default_materials

bar_length = 30.0
bar_width = 10.0
bar_height = 10.0
half_length = 0.5 * bar_length

bar = pv.RectPrism(pv.Vec3(0, 0, 0), pv.Vec3(bar_length, bar_width, bar_height))
fractions = pv.VolumeFractionsAttribute(
    [
        (f"1 - clamp((x + {half_length}) / {bar_length}, 0, 1)", materials.id("red")),
        (f"clamp((x + {half_length}) / {bar_length}, 0, 1)", materials.id("blue")),
    ]
)
bar.set_attribute(pv.DefaultAttributes.VOLUME_FRACTIONS, fractions)
root = bar

output_dir = os.path.join(os.path.dirname(__file__), "output", "volume_fractions")

hex_settings = pvc.SimulationHexMeshSettings()
hex_settings.voxel_size = pv.Vec3(0.25, 0.25, 0.25)

abaqus_settings = pvc.SimulationCompilerSettings()
abaqus_settings.output_directory = output_dir
abaqus_settings.file_prefix = "volume_fractions_hex"
abaqus_settings.backend = pvc.SimulationBackend.ABAQUS_INP
abaqus_settings.mesh_kind = pvc.SimulationMeshKind.HEX
abaqus_settings.hex_settings = hex_settings
abaqus_settings.random_seed = 42
abaqus_settings.material_defs = materials

high_fenics_settings = pvc.SimulationCompilerSettings()
high_fenics_settings.output_directory = output_dir
high_fenics_settings.file_prefix = "volume_fractions_tet_high"
high_fenics_settings.backend = pvc.SimulationBackend.FENICSX_XDMF
high_fenics_settings.mesh_kind = pvc.SimulationMeshKind.TET
high_fenics_settings.random_seed = 42
high_fenics_settings.material_defs = materials

high_tet_settings = pvc.SimulationTetFixedMeshSettings()
high_tet_settings.facet_size = 0.75
high_tet_settings.facet_distance = 0.5
high_tet_settings.cell_size = 0.75
high_fenics_settings.tet_fixed_settings = high_tet_settings

low_fenics_settings = pvc.SimulationCompilerSettings()
low_fenics_settings.output_directory = output_dir
low_fenics_settings.file_prefix = "volume_fractions_tet_low"
low_fenics_settings.backend = pvc.SimulationBackend.FENICSX_XDMF
low_fenics_settings.mesh_kind = pvc.SimulationMeshKind.TET
low_fenics_settings.random_seed = 42
low_fenics_settings.material_defs = materials

low_tet_settings = pvc.SimulationTetFixedMeshSettings()
low_tet_settings.facet_size = 2.25
low_tet_settings.facet_distance = 1.5
low_tet_settings.cell_size = 2.25
low_fenics_settings.tet_fixed_settings = low_tet_settings

pvc.SimulationCompiler(root, abaqus_settings).compile()
pvc.SimulationCompiler(root, high_fenics_settings).compile()
pvc.SimulationCompiler(root, low_fenics_settings).compile()

viz.Render(root, materials)
From the repository root, with the project virtual environment activated:
python examples/compilers/simulation/01_volume_fractions_export.py
This example highlights the settings you will change most often:
backendselects the output familymesh_kindselects hex or tetmaterial_defsprovides the base material ids used by the sampledmaterial_idfieldrandom_seedmakes the weighted stochastic element selection repeatabletet mesh sizing controls the amount of element-level mixing you can resolve
OpenVCAD preview#
This is the original continuous volume_fractions field before any stochastic element assignment:
OpenVCAD preview — volume_fractions

High-resolution tet export in ParaView#
The high-resolution tetrahedral export makes the stochastic material_id field look like a well-mixed gradient because there are enough elements to interdigitate the two materials. The raw volume_fraction_* fields stay smooth because they store the sampled continuous field directly. In this example the suffixes 1 and 3 come from the material ids assigned by pv.default_materials.
High-resolution ParaView — material_id

High-resolution ParaView — volume_fraction_1

High-resolution ParaView — volume_fraction_3

Low-resolution tet export in ParaView#
The low-resolution export uses the same underlying gradient, but the stochastic material_id field is much harder to read as a smooth transition because there are fewer elements available to represent the mixing pattern. The raw volume_fraction_1 field still shows the same continuous ramp.
Low-resolution ParaView — material_id

Low-resolution ParaView — volume_fraction_1

The practical takeaway is simple:
if your downstream solver only has a discrete material assignment path, you may need a finer mesh so the stochastic
material_idpattern captures the intended mixture behaviorif your downstream code can use the raw
volume_fraction_*arrays directly, the exporter already saves them for you
ParaView exposes the available cell datasets directly in the attribute selector:
ParaView attribute list — volume fractions export

Lesson 2: Direct mechanical property export#
The script examples/compilers/simulation/02_direct_mechanical_properties_export.py shows the direct scalar path. Here the bar carries:
modulusgraded along xpoissons_ratiograded along z
This lesson is intentionally export-only. It uses a different beam than Lesson 3:
here poissons_ratio varies through the beam height, while Lesson 3 uses a
separate cantilever beam where both elastic fields vary along the beam length.
Density is omitted so the walkthrough stays focused on the two scalar fields
that are carried directly into the simulation mesh.
import os
import shutil

import pyvcad as pv
import pyvcad_compilers as pvc
import pyvcad_rendering as viz

bar = pv.RectPrism(pv.Vec3(0, 0, 0), pv.Vec3(40.0, 12.0, 12.0))
bar.set_attribute(
    pv.DefaultAttributes.MODULUS,
    pv.FloatAttribute("1200 + 800 * clamp((x + 20.0) / 40.0, 0, 1)")
)
bar.set_attribute(
    pv.DefaultAttributes.POISSONS_RATIO,
    pv.FloatAttribute("0.20 + 0.15 * clamp((z + 6.0) / 12.0, 0, 1)")
)
root = bar

output_dir = "output"

direct_attributes = [
    pv.DefaultAttributes.MODULUS,
    pv.DefaultAttributes.POISSONS_RATIO,
]

fenics_settings = pvc.SimulationCompilerSettings()
fenics_settings.output_directory = output_dir
fenics_settings.file_prefix = "mechanical_tet"
fenics_settings.backend = pvc.SimulationBackend.FENICSX_XDMF
fenics_settings.mesh_kind = pvc.SimulationMeshKind.TET
fenics_settings.random_seed = 7
fenics_settings.direct_attributes = direct_attributes

tet_settings = pvc.SimulationTetFixedMeshSettings()
tet_settings.facet_size = 0.75
tet_settings.facet_distance = 0.75
tet_settings.cell_size = 0.75
fenics_settings.tet_fixed_settings = tet_settings

pvc.SimulationCompiler(root, fenics_settings).compile()
viz.Render(root)
Run the export with the fenicsx conda environment active:
conda activate fenicsx
python examples/compilers/simulation/02_direct_mechanical_properties_export.py
The key setting here is direct_attributes. It tells the compiler which
non-volume-fraction fields to carry into the output mesh as direct cell data.
Unlike the volume_fractions workflow, these attributes are not converted
into a stochastic material assignment. Each element simply stores its sampled
scalar value.
That means:
the exported fields remain smooth as long as the underlying field varies smoothly
mesh resolution still matters for how accurately the gradient is sampled
but resolution is no longer about representing a stochastic mixing pattern
OpenVCAD previews#
OpenVCAD preview — modulus

OpenVCAD preview — poissons_ratio

ParaView views of the exported cell fields#
ParaView — modulus

ParaView — poissons_ratio

Abaqus export from the same Lesson 2 beam#
The same Lesson 2 design can be exported to Abaqus by switching the backend and choosing a hexahedral mesh:
hex_settings = pvc.SimulationHexMeshSettings()
hex_settings.voxel_size = pv.Vec3(1.5, 1.5, 1.5)

abaqus_settings = pvc.SimulationCompilerSettings()
abaqus_settings.output_directory = "output"
abaqus_settings.file_prefix = "mechanical_hex"
abaqus_settings.backend = pvc.SimulationBackend.ABAQUS_INP
abaqus_settings.mesh_kind = pvc.SimulationMeshKind.HEX
abaqus_settings.random_seed = 7
abaqus_settings.direct_attributes = [
    pv.DefaultAttributes.MODULUS,
    pv.DefaultAttributes.POISSONS_RATIO,
]
abaqus_settings.hex_settings = hex_settings

pvc.SimulationCompiler(root, abaqus_settings).compile()
Think of the Abaqus path as the same mesh-and-attributes export idea written
into .inp form instead of an XDMF/H5 bundle.
Lesson 3: Solving the exported beam in FEniCSx#
The script examples/compilers/simulation/03_fenicsx_load_exported_design.py
is the full one-shot workflow. It loads a shared Lesson 3 beam definition,
exports the FEniCSx XDMF/H5 bundle, reloads the exported cell-wise material
fields inside DOLFINx, and solves a small-strain static cantilever problem.
Lesson 3 intentionally uses a different beam than Lesson 2. In this solved
cantilever example, the left face stays stiff, the free right face becomes much
softer, and poissons_ratio stays constant so the displacement trend is
driven primarily by the graded modulus.
Install notes:
conda create -n fenicsx -c conda-forge fenics-dolfinx mpi4py h5py numpy
conda activate fenicsx
If you already have a working DOLFINx environment, h5py and numpy
can also be installed with pip inside that environment.
OpenVCAD previews for the Lesson 3 beam#
The simulation script builds its beam from a shared helper before exporting it to FEniCSx. This preview shows the exact OpenVCAD modulus field used by the solve:
OpenVCAD preview — Lesson 3 modulus

You can read this preview as the mechanical setup for the solve: the modulus is highest at the fixed left face and drops steadily toward the free right face. That means the beam is progressively easier to deform as you move toward the tip, so we should expect larger displacements there once the load is applied.
The lesson-3 beam definition lives in
examples/compilers/simulation/lesson3_beam_definition.py so the FEniCSx
example in this lesson can import the same geometry and attributes:
def build_design():
    beam = pv.RectPrism(pv.Vec3(0, 0, 0), pv.Vec3(60.0, 12.0, 12.0))
    beam.set_attribute(
        pv.DefaultAttributes.MODULUS,
        pv.FloatAttribute("2400.0 - 2000.0 * clamp((x + 30.0) / 60.0, 0, 1)")
    )
    beam.set_attribute(
        pv.DefaultAttributes.POISSONS_RATIO,
        pv.FloatAttribute("0.28")
    )
    return beam
Governing equations#
The solve is the standard 3D isotropic linear-elastic form with a spatially
varying modulus E(x) and constant Poisson ratio nu:
with Lame parameters reconstructed from the exported OpenVCAD fields:
The weak form is:
with the left beam face fixed (u = 0) and a uniform end traction
t = (0, 0, -5) applied on the right beam face. Because the beam gets
softer toward the loaded end, the displacement magnitude ramps up more sharply
than in a uniform cantilever and is easy to inspect in ParaView.
Because the exported tetrahedral surface is slightly perturbed from the exact
analytic box, the script locates the left and right beam faces using a small
0.05 mm threshold around the mesh bounding box instead of relying on
exact x == min/max comparisons.
Key implementation snippets#
The full script lives at examples/compilers/simulation/03_fenicsx_load_exported_design.py.
The snippets below show the important stages without reproducing the whole file.
1. Export once on rank 0#
script_dir = os.path.dirname(os.path.abspath(__file__))
output_dir = os.path.join(script_dir, "output")

export_error = None
if comm.rank == 0:
    try:
        root = build_design()
        fenics_settings = pvc.SimulationCompilerSettings()
        fenics_settings.output_directory = output_dir
        fenics_settings.file_prefix = "simulation_results"
        fenics_settings.backend = pvc.SimulationBackend.FENICSX_XDMF
        fenics_settings.mesh_kind = pvc.SimulationMeshKind.TET
        fenics_settings.direct_attributes = [
            pv.DefaultAttributes.MODULUS,
            pv.DefaultAttributes.POISSONS_RATIO,
        ]
        pvc.SimulationCompiler(root, fenics_settings).compile()
    except Exception as exc:
        export_error = str(exc)

export_error = comm.bcast(export_error, root=0)
if export_error is not None:
    raise RuntimeError(f"OpenVCAD export failed on MPI rank 0: {export_error}")
2. Reload the exported cell fields with MPI-safe cell indexing#
The example uses beam_mesh.topology.original_cell_index so each MPI rank
pulls the correct subset of the exported cell arrays back into its local DG0
storage.
with XDMFFile(comm, xdmf_path, "r") as xdmf:
    beam_mesh = xdmf.read_mesh(name="OpenVCADMesh")

cell_space = fem.functionspace(beam_mesh, ("DG", 0))
modulus = fem.Function(cell_space, name="modulus")
poissons_ratio = fem.Function(cell_space, name="poissons_ratio")

with h5py.File(h5_path, "r") as h5:
    modulus_data = np.asarray(h5["/CellData/modulus"])
    poissons_ratio_data = np.asarray(h5["/CellData/poissons_ratio"])

original_cell_index = np.asarray(beam_mesh.topology.original_cell_index, dtype=np.int64)
modulus.x.array[:] = modulus_data[original_cell_index]
poissons_ratio.x.array[:] = poissons_ratio_data[original_cell_index]

modulus.x.scatter_forward()
poissons_ratio.x.scatter_forward()
3. Solve and patch the exported file in place#
After reloading the DG0 fields, the script reconstructs the Lam’e parameters,
solves the cantilever problem, evaluates DG0 von Mises stress, gathers the
result arrays to rank 0, and updates the original OpenVCAD export in place.
That means examples/compilers/simulation/output/simulation_results.xdmf
keeps the same mesh but gains three new
fields:
displacementas a node-centered vector fielddisplacement_magnitudeas a node-centered scalar fieldvon_misesas a cell-centered scalar field
On rank 0 the example also prints five equal-length x bins with their mean displacement magnitude, which gives you a quick terminal-side check that the response increases from the fixed end to the soft tip.
Run the full one-shot workflow with the fenicsx environment active:
conda activate fenicsx
python examples/compilers/simulation/03_fenicsx_load_exported_design.py
ParaView inspection workflow#
Open
examples/compilers/simulation/output/simulation_results.xdmfClick Apply
Switch the coloring dropdown between
modulus,poissons_ratio,displacement_magnitude, andvon_misesUse Warp By Vector with
displacementif you want a deformed beam view
In the displacement-magnitude result, the figure should get brighter toward the right-hand tip, and the warped shape should bend more strongly there. That is the direct visual signature of the softer material: the fixed end stays comparatively stiff, while the lower-modulus tip accumulates more displacement under the same applied traction.
ParaView — displacement magnitude result

ParaView — von Mises stress result

Lesson 4: Generic in-memory models#
The script examples/compilers/simulation/04_generic_in_memory_model.py
compiles the same graded bar to both HEX8 and TET4 without writing an
intermediate file. Select GENERIC, call compile(), and then retrieve the
prepared SimulationModel with model().
settings = pvc.SimulationCompilerSettings()
settings.backend = pvc.SimulationBackend.GENERIC
settings.mesh_kind = pvc.SimulationMeshKind.HEX

hex_settings = pvc.SimulationHexMeshSettings()
hex_settings.voxel_size = pv.Vec3(1.0, 1.0, 1.0)
settings.hex_settings = hex_settings

compiler = pvc.SimulationCompiler(root, settings)
compiler.compile()
model = compiler.model()
SimulationModel exposes:
cell_type:SimulationCellType.HEX8orSimulationCellType.TET4nodes_per_cell: 8 or 4nodes: compactVec3coordinatesconnectivity: flattened, zero-based node indicescell_centroids: oneVec3per elementmaterial_idsandmaterial_namesvolume_fraction_fieldsandscalar_fields
Reshape connectivity conceptually into consecutive groups of
nodes_per_cell. All cell fields align with that element order. The model is
owned by its compiler, so keep the compiler alive while using the returned
Python object. model() is available only after compiling with GENERIC, and
written_files() is empty for that backend.
Lesson 5: LS-DYNA keyword export#
The LSDYNA_K backend writes <file_prefix>.k, an LS-DYNA keyword deck
of the meshed design. It is a geometry-only export: nodes, solid elements,
one part per material, placeholder elastic materials, and part sets. It does
not write loads, boundary conditions, contact, or control cards; you add those
in your own LS-DYNA model.
Verified with LS-DYNA R16.1, SMP double precision
Checked:
Input phase. Decks of tetrahedra (ELFORM 13, 10, 4, 60) and hexahedra (ELFORM 1, 2), with one and two materials, with and without void elements, and in long format (automatic and forced), read and initialise without errors.
What LS-DYNA reports matches the export. Node and element counts, the part, section and material IDs, ELFORM, the
*MAT_ELASTICvalues, and the part masses agree with the exported element volumes to 1e-6.Short explicit run. With a test-only main deck that fixes the bottom, presses the top, and runs for 2 ms, the tetrahedral cube, the hexahedral cubes and the graded gyroid block of this lesson terminate normally. The energy ratio stays within 1.000 to 1.003, and hourglass energy on ELFORM 1 hexahedra stays below 0.01 % of the internal energy.
Not checked: real material models, contact, impact or test validation, single-precision builds, and MPP builds.
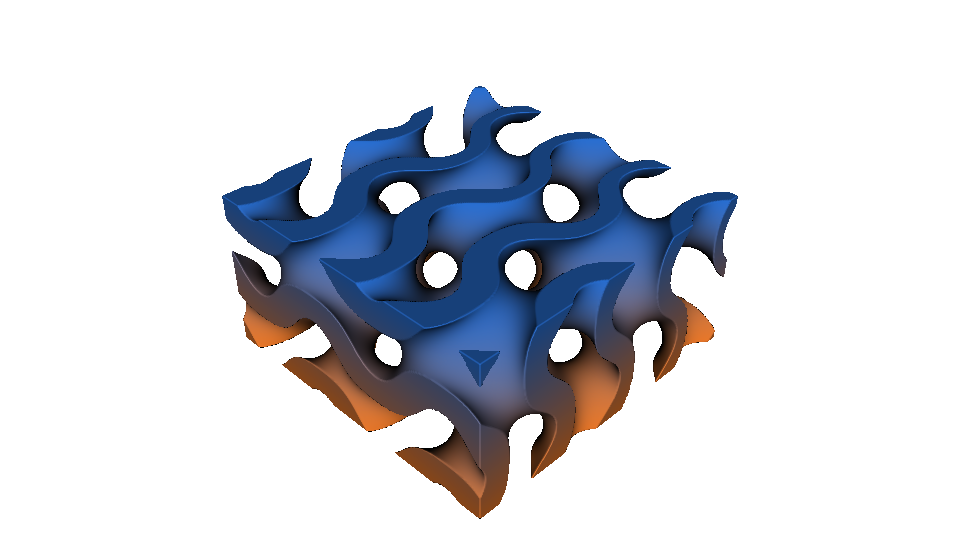
The script examples/compilers/simulation/05_lsdyna_graded_gyroid.py builds
a 20 x 20 x 10 mm gyroid block. Its walls thicken along x, and its material
blends from a soft polymer at the bottom to a stiff polymer at the top. The
script exports the block as linear tetrahedra:
import os

import pyvcad as pv
import pyvcad_compilers as pvc
import pyvcad_metamaterials as mm
import pyvcad_rendering as viz

script_dir = os.path.dirname(os.path.abspath(__file__))

# The material table names the two parts. Its optional density (tonne/mm^3),
# modulus (MPa) and poissons_ratio entries fill the placeholder *MAT_ELASTIC
# cards; materials without them get the writer defaults.
materials = pv.MaterialDefs(os.path.join(script_dir, "lsdyna_materials.json"))

block_min = pv.Vec3(-10.0, -10.0, -5.0)
block_max = pv.Vec3(10.0, 10.0, 5.0)
cell_map = mm.rectangular_cell_map((block_min, block_max), cells=(2, 2, 1))

# Gyroid walls grow from 0.8 mm at x = -10 to 2.0 mm at x = +10.
wall_thickness = pv.FloatAttribute("0.8 + 1.2 * (x + 10.0) / 20.0")
gyroid = mm.gyroid(cell_map, wall_thickness=wall_thickness)

# Soft polymer at the bottom (z = -5), stiff polymer at the top (z = +5).
gyroid.set_attribute(
    pv.DefaultAttributes.VOLUME_FRACTIONS,
    pv.VolumeFractionsAttribute(
        [
            ("1 - clamp((z + 5.0) / 10.0, 0, 1)", materials.id("soft_polymer")),
            ("clamp((z + 5.0) / 10.0, 0, 1)", materials.id("stiff_polymer")),
        ]
    ),
)
root = gyroid

tet_settings = pvc.SimulationTetFixedMeshSettings()
tet_settings.facet_size = 0.6
tet_settings.facet_distance = 0.1
tet_settings.cell_size = 0.6

settings = pvc.SimulationCompilerSettings()
settings.output_directory = os.path.join(script_dir, "output")
settings.file_prefix = "graded_gyroid"
settings.backend = pvc.SimulationBackend.LSDYNA_K
settings.mesh_kind = pvc.SimulationMeshKind.TET
settings.tet_fixed_settings = tet_settings
settings.random_seed = 7
settings.material_defs = materials

# LS-DYNA options: tets are written as degenerate 8-node solids. ELFORM 13 is
# the default, but the two polymers have different bulk moduli and share
# nodes, which ELFORM 13 does not allow, so this deck gets
# mixed_material_tet_element_formulation (ELFORM 10). Void elements are
# dropped by default.
settings.lsdyna_settings.title = "OpenVCAD graded gyroid block"
settings.lsdyna_settings.tet_element_formulation = 13
settings.lsdyna_settings.mixed_material_tet_element_formulation = 10

compiler = pvc.SimulationCompiler(root, settings)
compiler.compile()
print("LS-DYNA deck:", compiler.written_files())
print("Nodes:", compiler.node_count(), "Elements:", compiler.element_count())

viz.Render(root, materials)
From the repository root, with the project virtual environment activated:
python examples/compilers/simulation/05_lsdyna_graded_gyroid.py
It writes examples/compilers/simulation/output/graded_gyroid.k, with
about 39,000 tetrahedra in two parts. compiler.element_count() counts the
whole mesh; the deck header states how many elements were written and how many
void elements were left out.
OpenVCAD preview — volume_fractions
What the deck contains#
Keyword |
Content |
|---|---|
|
First card, then |
|
One per material. The heading is the material name. |
|
One per part, with the element formulation ( |
|
One placeholder elastic material per part (density, Young’s modulus, Poisson’s ratio). |
|
One set per part, plus one set ( |
|
The mesh. |
|
End of input. |
Part i uses section i, material i, and part set i, so the IDs always match. The set with every part has the next ID after the last part.
Elements and formulations#
Tetrahedra (TET) are written as degenerate 8-node solids: nodes 5 to 8
repeat node 4, which is how *ELEMENT_SOLID takes 4-node tetrahedra.
ELFORM 13(default,tet_element_formulation) is the 1-point tetrahedron with nodal pressure averaging. It resists volumetric locking, so it suits soft, nearly incompressible polymers.ELFORM 13 averages pressures over all tetrahedra around a node. The LS-DYNA Keyword Manual (Vol. I,
*SECTION_SOLID, remark 12) states that ELFORM 13 parts with different bulk moduli must not share nodes, and LS-DYNA prints warning 30490 for such decks. In a check with LS-DYNA R16.1, the graded gyroid block above developed negative internal energy within 0.2 ms with ELFORM 13, and its time step collapsed near 0.8 ms. With equal bulk moduli, or with ELFORM 10, it ran stably. The exporter therefore writesmixed_material_tet_element_formulation(default 10, the plain 1-point tetrahedron, which LS-DYNA’s warning suggests) when the parts’ bulk moduliE / (3 (1 - 2 nu))differ and the parts share nodes. The deck header says so. Decks with one material, or with equal bulk moduli (for example the placeholder defaults), keep ELFORM 13.ELFORM 10 has no pressure averaging, so it can lock with nearly incompressible materials. ELFORM 60 averages too and, unlike 13, allows shared nodes between different bulk moduli (remark 15; explicit analysis, still under development for implicit). In the same gyroid press, ELFORM 60 also ran stably. It needed about half the internal energy of ELFORM 10 for the same top displacement, a sign that ELFORM 10 locks with the
poissons_ratio = 0.45soft polymer, and it took about three times as long. For explicit runs of nearly incompressible graded materials, setmixed_material_tet_element_formulation = 60.Any other
tet_element_formulationis written as given. ELFORM 4, 10, 13 and 60 were checked with LS-DYNA R16.1.ELFORM 16 and 17 are 10-node tetrahedra (remark 11). LS-DYNA stops with error 21299 when they are used on 4-node tetrahedra, so the exporter raises an error instead.
Hexahedra (HEX) are written natively (hex_element_formulation):
ELFORM 1(default) is the constant-stress solid, with one integration point. Watch hourglass energy in long or large-deformation runs.ELFORM 2is the fully integrated solid.Tetrahedron formulations (4, 10, 13, 60) and 20-node or higher-order formulations (23 to 29) raise an error, because LS-DYNA cannot use them on 8-node hexahedra.
Units#
Keyword decks store no units; they only have to be consistent. The exporter uses this set, which is stated in every deck header:
Quantity |
Unit |
|---|---|
Length |
mm |
Time |
s |
Mass |
tonne (1000 kg) |
Force |
N |
Stress, Young’s modulus |
MPa (N/mm²) |
Density |
tonne/mm³ ( |
Energy |
mJ (N·mm) |
Velocity |
mm/s |
OpenVCAD node coordinates are in millimetres. If your main deck uses another consistent set, convert the material values, or scale the mesh, to match.
Placeholder materials and how to replace them#
The *MAT_ELASTIC cards are placeholders that keep the deck complete and let
it initialise. For each material, the values come from its entry in
material_defs when the entry has density (tonne/mm³), modulus (MPa), or
poissons_ratio keys. Missing values use default_density (1e-9),
default_modulus (100) and default_poissons_ratio (0.3). The example’s
material table looks like this:
{
    "materials": [
        {"name": "soft_polymer", "r": 235, "g": 120, "b": 40, "a": 255,
         "density": 1.1e-9, "modulus": 30.0, "poissons_ratio": 0.45},
        {"name": "stiff_polymer", "r": 40, "g": 110, "b": 210, "a": 255,
         "density": 1.2e-9, "modulus": 1500.0, "poissons_ratio": 0.35}
    ]
}
To use real materials, replace each *MAT_ELASTIC card with your own material
card (for example a foam or hyperelastic model) and keep the same material
ID, which is the part ID. Every *PART already points at its material and
section by that ID. If you change materials in your own deck rather than in
the material table, check the ELFORM choice above: it was made from the
placeholder bulk moduli.
Per-element direct_attributes are not written to the deck. LS-DYNA assigns
materials per part, so graded properties need your own binning into parts.
Void elements and IDs#
Void elements. Elements whose sampled material is void (material ID 0,
including boundary elements whose centroid sample has no material) are left
out by default, together with nodes that only they use. Set
include_void_elements = True to keep them as their own part (named void,
with the placeholder material). The example drops 32 such boundary elements.
Both variants were checked with LS-DYNA R16.1.
IDs. Node IDs are the node index + 1 and element IDs are the element index
1, so they match the
GENERICmodel and the Abaqus export. Dropped void elements leave gaps, which LS-DYNA allows.node_id_offset,element_id_offset, andpart_id_offsetshift the IDs so the deck can be included in a larger model without clashes.
Large IDs. Standard keyword fields hold node and element IDs up to
99,999,999. If any ID is larger, the whole deck switches to long format
(*KEYWORD LONG=Y, 20-column fields). Set long_format = True to force it.
IDs above 2,147,483,647 are rejected with an error.
Limits#
Linear elements only: 4-node tetrahedra (as degenerate solids) and 8-node hexahedra. 10-node formulations are rejected.
One part per material, and at most 255 materials. Grading inside a material is not carried into the deck.
Placeholder
*MAT_ELASTIConly. No loads, boundary conditions, contact, controls, or output requests.Tetrahedral meshes can contain thin elements that set the explicit time step. The example block’s smallest step is about 3e-8 s with the placeholder stiff polymer. LS-DYNA lists the smallest steps under
100 smallest timestepsind3hsp. Coarser meshing, or mass scaling in your own main deck, raises it.
Using the deck in an LS-DYNA model#
Keep the exported file unchanged and include it from your own main deck, which adds the analysis setup:
*KEYWORD
*TITLE
Drop test using the OpenVCAD gyroid block
*INCLUDE
graded_gyroid.k
$ ... your *CONTROL, *BOUNDARY, *LOAD, *CONTACT and output cards ...
*END
The exported file ends with *END, which ends an included file.
Checking a deck in LS-DYNA#
The exported deck runs on its own as an input check. Without
*CONTROL_TERMINATION, LS-DYNA reads it, initialises every element, writes
the model summary, and stops at time 0:
python examples/compilers/simulation/05_lsdyna_graded_gyroid.py
cd examples/compilers/simulation/output
<path to ls-dyna> i=graded_gyroid.k ncpu=1 memory=200m
Then look at the files LS-DYNA writes next to the deck:
messagandd3hspend withN o r m a l t e r m i n a t i o n, andmessaghas no*** Errorlines. Warning 20006 (the d3plot output interval was reset) is expected for a geometry-only deck. Warning 30490 appears only when ELFORM 13 parts share nodes.d3hsplistsnumber of nodal+scalar pointsandnumber of solid elements, which matchNodes:andElements:in the deck header.Each part block in
d3hspshowspart id,section idandmaterial id(all equal),material type 1(*MAT_ELASTIC), andsolid formulation(the ELFORM).summary of massind3hspgives the mass of each part, which is the part volume times its density.
An inverted or zero-volume element stops LS-DYNA in this input phase, so a normal termination also confirms the element orientation.
OpenVCAD includes this check as an opt-in test. It exports small cubes and the
gyroid block, runs each deck alone, compares what LS-DYNA reports with the
export, and runs the short explicit press through a test-only main deck that
*INCLUDEs the export. It is skipped unless OPENVCAD_LSDYNA_EXE points at an
LS-DYNA executable. Licensing comes from your usual LS-DYNA environment
variables.
OPENVCAD_LSDYNA_EXE=/path/to/ls-dyna python -m pytest compilers/tests/python/test_simulation_lsdyna_solver.py -v
Checking a deck without LS-DYNA#
The Ansys PyDyna package reads keyword decks without a license:
pip install ansys-dyna-core
from ansys.dyna.core import Deck

deck = Deck()
with open("examples/compilers/simulation/output/graded_gyroid.k") as handle:
    result = deck.loads(handle.read())

print(result.get_summary() or "every keyword was recognised")
for keyword in deck.keywords:
    print(type(keyword).__name__)
PyDyna 0.12.1 reads every keyword this backend writes in standard format. For
long-format decks it reads all of them except the *ELEMENT_SOLID fields,
which it misreads (it cannot read its own long-format solids either). LS-DYNA
itself reads them correctly.
LS-DYNA settings#
settings.lsdyna_settings is a SimulationLsDynaSettings object:
Setting |
Default |
Meaning |
|---|---|---|
|
|
|
|
|
|
|
|
|
|
|
Keep void elements as their own part. |
|
|
Force |
|
|
|
|
|
Placeholder density in tonne/mm³. |
|
|
Placeholder Young’s modulus in MPa. |
|
|
Placeholder Poisson’s ratio. |
|
|
Added to every node ID. |
|
|
Added to every element ID. |
|
|
Added to every part, section, material, and part-set ID. |
Practical settings reference#
Setting |
Meaning |
|---|---|
|
Folder used by file backends; ignored by |
|
Prefix used by file backends; ignored by |
|
Transport: |
|
Element family: |
|
Regular hexahedral cell size in millimeters. |
|
Surface triangle size target for fixed tet meshing. |
|
Surface approximation tolerance for fixed tet meshing. |
|
Interior tetrahedral size target. |
|
Seed used for deterministic tet generation and stochastic material assignment. |
|
Base material definitions used when exporting |
|
List of scalar attributes to export directly as cell data. |
|
|
Further examples#
examples/compilers/simulation/01_volume_fractions_export.py— stochastic material assignment plus raw volume-fraction datasetsexamples/compilers/simulation/02_direct_mechanical_properties_export.py— export-only direct scalar mechanical fields withpoissons_ratiovarying through zexamples/compilers/simulation/03_fenicsx_load_exported_design.py— self-contained DOLFINx/FEniCSx cantilever solve with a stiff-to-soft modulus gradient along xexamples/compilers/simulation/04_generic_in_memory_model.py— direct Python access to compact solver-neutralHEX8andTET4modelsexamples/compilers/simulation/05_lsdyna_graded_gyroid.py— geometry-only LS-DYNA keyword deck of a graded two-material gyroid block